Difference between revisions of "Using CDD"
(→Getting Started) |
|||
| Line 3: | Line 3: | ||
= Getting Started = | = Getting Started = | ||
| − | + | CDD adds two new tool windows, named ''''Testing'''' and ''''CDD Output'''' to EiffelStuio. By default they are not visible. Make them visible by going to the menu ''''View -> Tools'''' and select ''''Testing'''' and ''''CDD Output'''': | |
[[Image:enable_cdd.png|center]] | [[Image:enable_cdd.png|center]] | ||
| − | + | The two main features of CDD are test case execution and test case extraction. The first will cause the execution of your test cases after every compilation and the second will extract a new test case after every exception. By default both features are disabled. Enable both by pressing the two toolbar buttons marked in red below: | |
[[Image:enable_exec_and_extract.png|center]] | [[Image:enable_exec_and_extract.png|center]] | ||
Revision as of 07:14, 28 January 2008
Contents
Getting Started
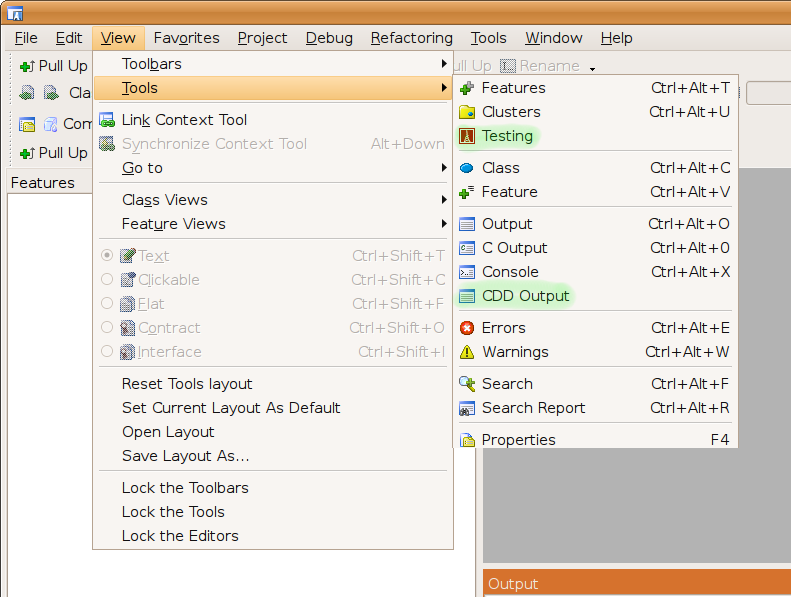
CDD adds two new tool windows, named 'Testing' and 'CDD Output' to EiffelStuio. By default they are not visible. Make them visible by going to the menu 'View -> Tools' and select 'Testing' and 'CDD Output':
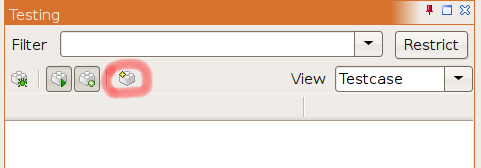
The two main features of CDD are test case execution and test case extraction. The first will cause the execution of your test cases after every compilation and the second will extract a new test case after every exception. By default both features are disabled. Enable both by pressing the two toolbar buttons marked in red below:
How to add a manual test case
To add a manual test case simply create a new class whose name contains the word 'TEST', have it inherit from CDD_TEST_CASE and add one or several unit test routines. Make sure that all unit test routines start with 'test_'. Here is a simple example test class:
class TEST_BANK_ACCOUNT
inherit CDD_TEST_CASE
feature
  test_deposit
    local
      ba: BANK_ACCOUNT
    do
      create ba.make_with_balance (0)
      ba.deposit (100)
      check
         money_depisited: ba.balance = 100
      end
    end
end
After you have added your test class, recompile and your test case should automatially appear in the 'Testing' tool window. A template test case can created by pressing the 'Create new manual test case' button:
How to extract a test case
CDD automatically extracts a new test case after every thrown exception. This test case will appear in the normal test case tool window and can be managed like an ordinary manually written test case.
How to search for a test case
Use the filter text box to search for test case by name or tag. Make sure you press enter after you have changed the filter text.
How to add a tag to a test case
You can add custom tags to test cases by adding a indexing item 'tag' to either the test class or the test routine. Here is an example of a test class with a tag:
indexing
  tag: "fixme"
class TEST_BANK_ACCOUNT
inherit CDD_TEST_CASE
feature
  test_deposit
    local
      ba: BANK_ACCOUNT
    do
      create ba.make_with_balance (0)
      ba.deposit (100)
      check
         money_depisited: ba.balance = 100
      end
    end
end
How to restrict test case execution
If the 'Restrict' push-button is pressed, only test cases matching the current filter criterion (i.e. test cases that show up in the tree-view) will be executed. You can use this to shorten testing time when working on a particular subset of your program.


